Orchestrating custom code with AWS Batch
This does not Spark joy
I ran into a situation today where we needed to run a piece of custom code as a batch process, make this repeatable and serve for the lowest cost. This custom code was already baked and tested, so there wasn’t any scope to refactor the code or port it to something that would be friendly to run on Amazon EMR, AWS Glue or anything Spark related.
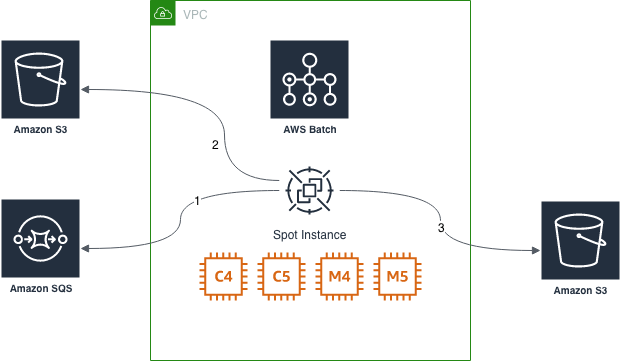
So the idea was to wrap the custom code lib, build a container and use AWS Batch to run this on EC2 Spot instances. Below is prototype of the code to demonstrate this working, a list of the main components:
- AWS Batch - orchestration service where we define our compute and job parameters
- Amazon SQS - queue to batch up work for the custom code to run
- Amazon S3 - this is used as the source/destination for reading raw data and then storing calculated results
I will be using AWS CDK to define the infrastructure we need to be deployed using CloudFormation.
It’s a wrap…not quite
In this example we have some .NET code that is doing some work on a data set and storing the result. To simulate this I have taken an example from the AWS .NET SDK where we are querying some data from S3 and saving the results as JSON. We are not going to focus to much on the actual code here as it being used to create a arbitrary memory process on the container to read and write a stream. This is trying to represent the real world use case I have which is to take a string and return some JSON…simple enough?
So I wrote a wrapper around this function that does the following:
- Read a SQS Message which has details on the source file to be read - this is batched by another function
- Query S3 using S3 Select to gather a limited set of results
- Pass the string into the custom code and return JSON
- Upload the processed data to S3
- Delete the message from SQS to indicate success
The source for this can be found here.
Contain this
The Batch User Guide has a great example of building a Docker image and parallel running this across a number of jobs. I’ve used much of this to scaffold out the infrastructure I needed using CDK. This guide covers creating the image, pushing to ECR and the Job Definition you need to run jobs.
Using EC2 Spot instances is a great solution for this, this isn’t a mission critical or time sensitive job so I can get some significant savings by using Spot instances to run my containers. AWS Batch manages spinning up and down the compute environment when the jobs need to run so that I am only paying for running the jobs.
So a quick highlight of the some of the CDK code we need:
Create the IAM roles and permissions required
const batchServiceRole = new iam.Role(this, 'batchServiceRole', {
  roleName: 'batchServiceRole',
  assumedBy: new ServicePrincipal('batch.amazonaws.com'),
  managedPolicyArns: [
    'arn:aws:iam::aws:policy/service-role/AWSBatchServiceRole'
  ]
});

const spotFleetRole = new iam.Role(this, 'spotFleetRole', {
  roleName: 'AmazonEC2SpotFleetRole',
  assumedBy: new ServicePrincipal('spotfleet.amazonaws.com'),
  managedPolicyArns: [
    'arn:aws:iam::aws:policy/service-role/AmazonEC2SpotFleetTaggingRole'
  ]
});

const batchInstanceRole = new iam.Role(this, 'batchInstanceRole', {
  roleName: 'batchInstanceRole',
  assumedBy: new iam.CompositePrincipal(
      new ServicePrincipal('ec2.amazonaws.com'),
      new ServicePrincipal('ecs.amazonaws.com')),
  managedPolicyArns: [
    'arn:aws:iam::aws:policy/AmazonS3FullAccess'
  ]
});

new iam.CfnInstanceProfile(this, 'batchInstanceProfile', {
  instanceProfileName: batchInstanceRole.roleName,
  roles: [
    batchInstanceRole.roleName
  ]
});
Note You need to create IAM Instance profile for the containers to execute under, just creating a role in CDK is not enough
Create the Batch Compute
const compEnv = new batch.CfnComputeEnvironment(this, 'batchCompute', {
  type: 'MANAGED',
  serviceRole: batchServiceRole.roleArn,
  computeResources: {
    type: 'SPOT',
    maxvCpus: 128,
    minvCpus: 0,
    desiredvCpus: 0,
    spotIamFleetRole: spotFleetRole.roleArn,
    instanceRole: batchInstanceRole.roleName,
    instanceTypes: [
      'optimal'
    ],
    subnets: [
      vpc.publicSubnets[0].subnetId,
      vpc.publicSubnets[1].subnetId,
      vpc.publicSubnets[2].subnetId
    ],
    securityGroupIds: [
      vpc.vpcDefaultSecurityGroup
    ]
  }
});
Important “instanceRole” should be the IAM Role Name, NOT the IAM Role ARN, if you get this incorrect you will end up with a “INVALID” Batch Compute Environment and need to fix the name and recreate it from scratch.
Create a Job Definition
new batch.CfnJobDefinition(this, 'batchJobDef', {
  jobDefinitionName: "s3select-dotnet",
  type: "container",
  containerProperties: {
    image: this.accountId + ".dkr.ecr.us-east-1.amazonaws.com/mjsdemo-ecr:latest",
    vcpus: 1,
    memory: 128,
    environment: [
      {
        name: "SQS_QUEUE_URL",
        value: sqsQueue.queueUrl
      },
      {
        name: "S3_QUERY_LIMIT",
        value: " LIMIT 10000"
      }
    ]
  }
});
The nice thing here is that I can inject my SQS details from earlier on in the stack and pass them into the container as environment variables.
Then I jump to the Console or CLI and submit my job, something like the example:
aws batch submit-job --job-name jobdemo --job-queue batchJobSpot --job-definition s3select-dotnet --array-properties size=100 --container-overrides environment=[{name=S3_QUERY_LIMIT,value=2000}] --generate-cli-skeleton
So taking a look at some CloudTrail logs our Spot instance details are: Start Time: 2019-06-11, 04:54:24 PM End Time: 2019-06-11, 05:04:49 PM Duration: 10 Min 25 Sec (625 Sec) Instance Type: c4.4xlarge Availability Zone: us-east-1a On Demand Price: 0.7960 Spot Price: 0.2526
On Demand Cost: 0.138194444444444 Spot Cost: 0.043854166666667 Saving: 0.94340277777777
Or to put it another way 68% reduction!
This might seem small change but for 100’s, 1,000’s and 10,000’s of job running over a month that small change will add up!


